配置结构 "布局
•显示高级参数
名称 |
|||||||
定子电机(右键单击编辑) |
|||||||
定子电机 1-N |
|||||||
X |
|||||||
Y |
|||||||
名称 |
|||||||
主 |
|||||||
电源区段名称 |
|||||||
布局编辑器
打开布局编辑器
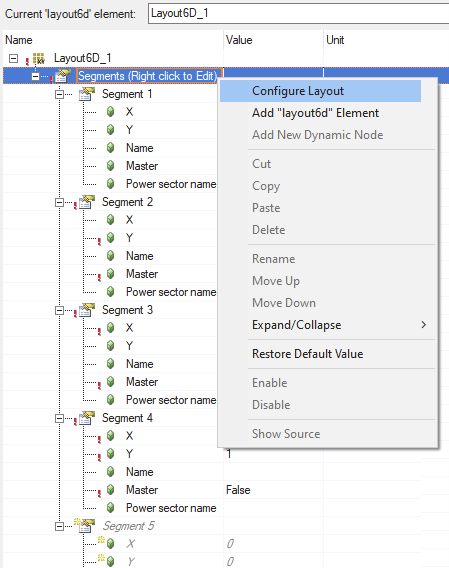
右键单击 "定子电机 "打开布局编辑器。![]()
配置布局尺寸
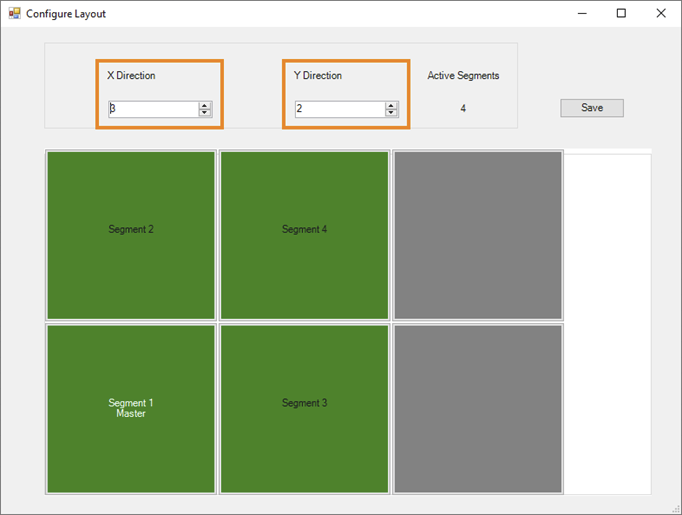
更改 "x-方向 "和 "y-方向 "值以增大或减小布局尺寸。
打开和关闭定子电机
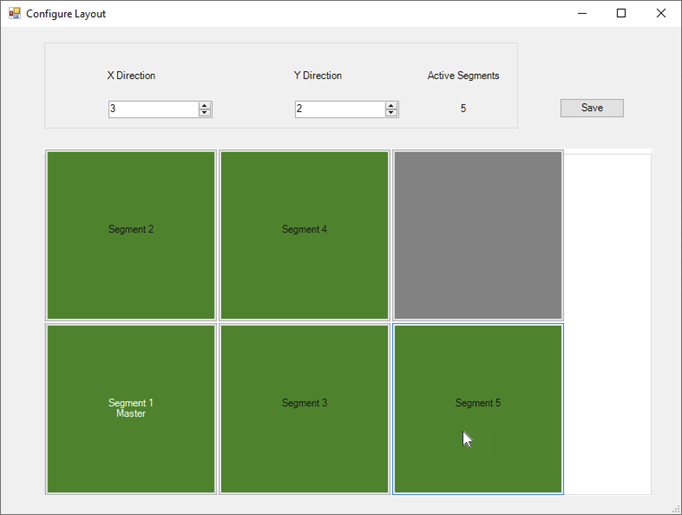
左键单击一个定子电机以启用或禁用它。![]()
一旦分段数发生变化,显示的分段 ID 会自动更新为所有分段。
选择主分段
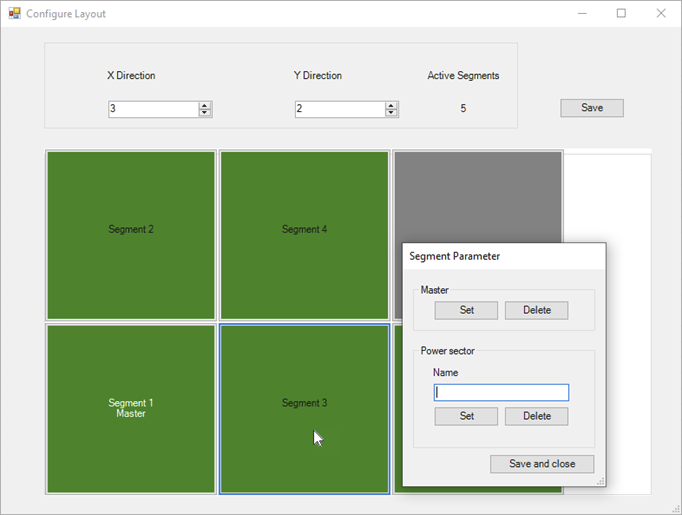
右键单击一个分段,打开分段参数对话框。![]()
在此对话框中,可以将分段定义为主分段,并设置其他分段参数。
要选择一个分段作为主分段,首先点击 "主 "区域中的 "设置"。要应用更改,请单击 "保存并关闭"。
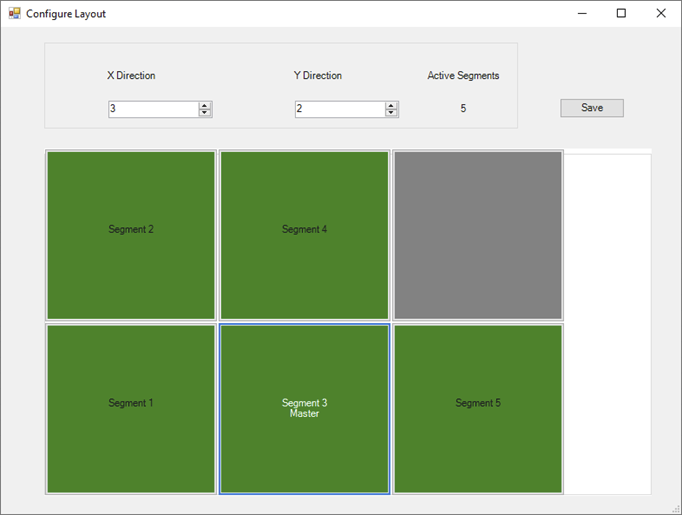
新的主电机段将立即显示为主电机段。由于只能有一个主分段,因此之前主分段上的设置将被移除,并再次显示为普通分段。
信息:
主分段必须位于左侧或底部外缘。定子电机段的选择选项会自动禁用。
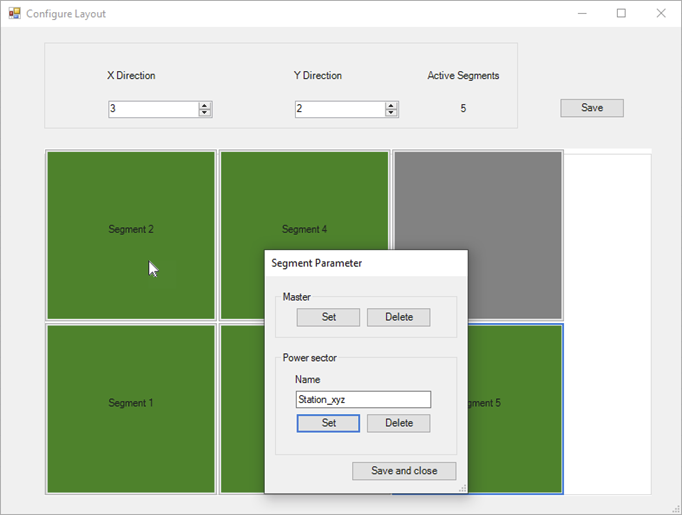
定义动力区段
右键单击定子电机,打开定子参数对话框。![]()
在此对话框中,可将线段分配到一个电源扇区,并设置其他线段参数。
要将分段分配给一个电力扇区,请在 "电力扇区 "区域输入名称,然后单击 "设置"。要应用更改,请单击 "保存并关闭"。
定义新的扇区时,不允许使用现有名称。若要为已存在的扇形区域分配一个电机段,则必须输入已定义的名称。
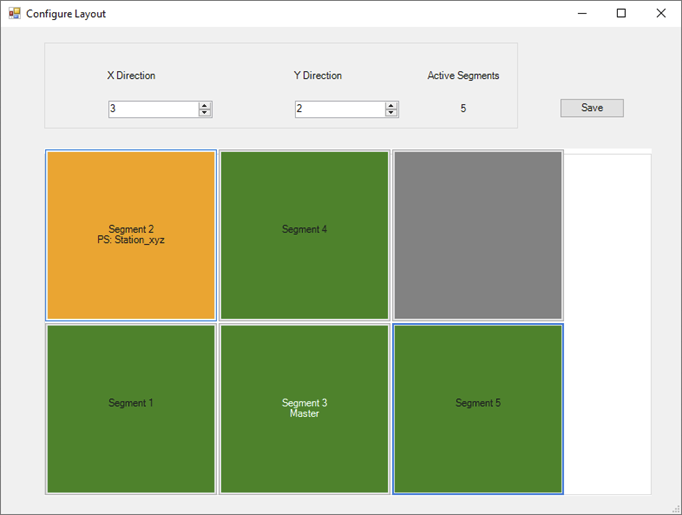
分配给某个电力分区的分段会突出显示,电力分区的名称会显示在分段 ID 下。
信息:
主分段不能分配给某一电力扇区,因此该选择选项会自动禁用。
信息:
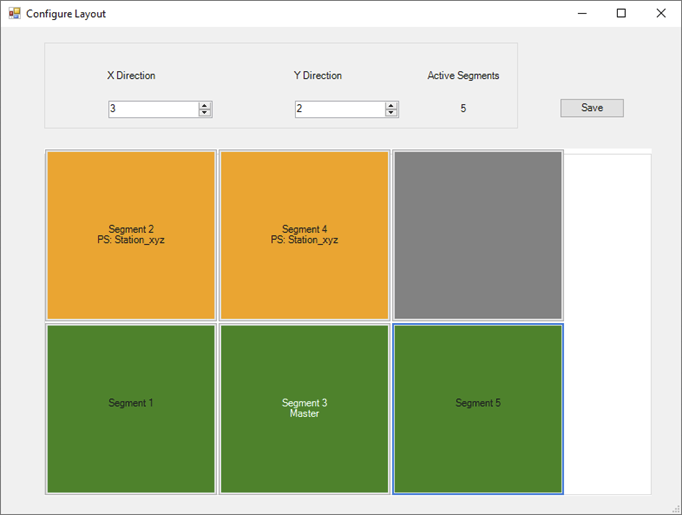
重要信息
非动力分区的分段不允许被动力分区从主分段中切断。这意味着非电源扇区电机段的边必须是连续的。这样可以确保每个电机段在任何时候都能通过主电机段与 ACOPOS 6D 控制器通信,即使单个电源扇区被停用并与电源断开。
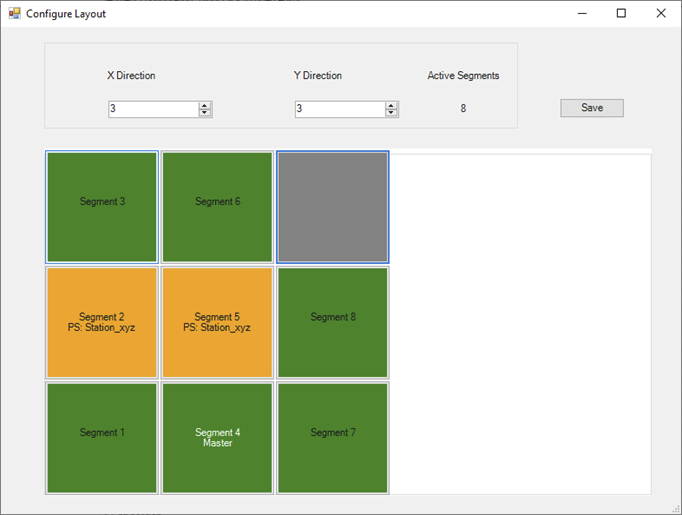
下面的布局不起作用,因为如果停用电源扇区 "Station_xyz",3 号和 6 号分段就无法再与 ACOPOS 6D 控制器通信。
重要提示
电源扇区的定子电机段必须连续。这意味着扇形区段的两侧必须相邻。
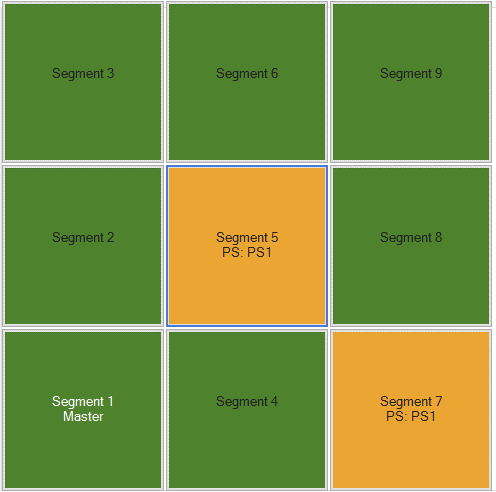
PS1 "的定子电机段不毗连。
Configuration structure "Layout"
•Show advanced parameter
Name |
|||||||
Segments (Right click to Edit) |
|||||||
Segment 1-N |
|||||||
X |
|||||||
Y |
|||||||
Name |
|||||||
Master |
|||||||
Power sector name |
|||||||
Layout editor
Opening the layout editor
Right-click on "Segments" to open the layout editor.![]()
Configuring the layout size
Change the "x-direction" and "y-direction" values to increase or decrease the layout size.
Switching segment on and off
Left-click on a segment to enable or disable it. ![]()
The displayed segment ID is automatically updated for all segments as soon as the number of segments changes.
Selecting a master segment
Right-click on a segment to open the dialog box for the segment parameters. ![]()
In this dialog box, the segment can be defined as a master segment and additional segment parameters can be set.
To select a segment as a master segment, first click on "Set" in the "Master" area. To apply the change, click on "Save and close".
The new master segment is immediately indicated as such. Since there can be only one master segment, the setting is removed from the previous master segment and it is indicated again as a normal segment.
Information:
The master segment must be located on either the left or bottom outer edge. The selection option for segments is automatically disabled.
Defining a power sector
Right-click on a segment to open the dialog box for the segment parameters. ![]()
In this dialog box, the segment can be assigned to a power sector and additional segment parameters can be set.
To assign a segment to a power sector, enter a name in the "Power sector" area and click on "Set". To apply the change, click on "Save and close".
Using an existing name is not permitted when defining a new power sector. To assign a segment to an already existing power sector, the already defined name must be entered.
Segments assigned to a power sector are highlighted and the name of the power sector is displayed under the segment ID.
Information:
The master segment cannot be assigned to a power sector and therefore this selection option is automatically disabled.
Information:
Important information
Segments that are not power sectors are not permitted to be cut off from the master segment by power sectors. This means the sides of the non-power sector segments must be contiguous. This ensures that each segment can communicate with the ACOPOS 6D controller via the master segment at any time, even if individual power sectors are deactivated and disconnected from the power supply.
The following layout does not work because segments 3 and 6 can no longer communicate with the ACOPOS 6D controller if power sector "Station_xyz" is deactivated.
Important note
The segments of a power sector must be contiguous. This means the sides of the power sector segments must be adjoined.
The segments of "PS1" are not contiguous.